Azure DevOps Pipelines – Shared Artifacts Between Pipelines
Did you know you can share artifacts between builds in Azure Pipelines?
One scenario for this is a single repository with scripts that multiple pipelines in an Azure DevOps Project need to use. I've utilized this feature regularly and it helps with reducing repetition and potential manual mistakes (Don't Repeat Yourself). If the script needs to be changed, it is updated in the shared repository, instead of each individual pipeline. Once the build completes, all pipelines referencing this artifact now have access to the new version of the script.
In this post I'll walk through how the shared repository and build is set up and how to access the created artifacts from a separate pipeline in the same Azure DevOps organization.
Requirements to follow along
-
This post assumes basic knowledge of multi-stage yaml pipelines in Azure DevOps. If you are new to yaml pipelines, check out my Multi-stage Pipeline series (Start with Part One here - https://www.mercuryworks.com/blog/creating-a-multi-stage-pipeline-in-azure-devops/).
-
Azure Subscription – Sign up for a free account https://azure.microsoft.com/en-us/free/
-
Azure DevOps Account – Sign up for a free account https://azure.microsoft.com/en-us/services/devops/
-
Repository – Any Git repository can be used and connected to Azure Pipelines but this walkthrough will utilize Azure Repos Git repository
-
IDE – This walk through was created using Visual Studio Code which has extensions for Pipeline syntax highlighting
Base Project and Pipeline
At the end of Part 2 in my pipeline series we ended up with a complete, though basic, pipeline. We are going to use this as the starting point for this walk through (https://github.com/cashewshideout/blog-azurepipeline/tree/post2-release).
This project has a simple .Net Core application in C# with a single unit test. The yaml pipeline has 3 stages – Build, Staging Deployment, and Production Deployment. The tasks for each stage are as follows -
Build Tasks
- Set the version of .Net Core
- Publish the .Net Core application
- Run Unit Tests
- Archive compiled project files
- Publishes Build Artifact
Staging and Production Deployment Tasks
- Downloads Build Artifact
- Extract files
- WebDeploy to an Azure App Service
In this walkthrough I will refer to this project and pipeline using the terms "Base Repository", "Base Project" or "Base Pipeline".
Shared Repository - Script
The script that we want to share between pipelines is a PowerShell script that runs on each deployment stage before the WebDeploy task. It will list all resources in the Resource Group that the App Service we are deploying to contains.
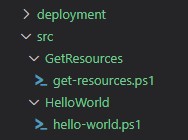
This repository will hold all shared scripts and files so organize the directory into appropriate folders. In the screenshot below the deployment folder is where the pipeline file lives. Under the src folder there are two folders, each containing their own script.

In this walkthrough I will refer to this project and pipeline using the terms "Shared Repository", "Shared Artifacts", "Shared Scripts" or "Shared Pipeline".
Our script is going to be pretty simple but this concept can be implemented for any script that would be used across multiple pipelines (or even IaC template files, config files, etc). The important thing is to keep it generic and use parameters that each pipeline can define values for instead of hard-coding them.
This is the code for get-resources.ps1
The script hello-world.ps1 in this repository is a single line: echo "Hello world". We will not be utilizing this script in this walkthrough but I included it to demonstrate how to only reference the files needed in the Base Pipeline.
In Azure DevOps, this code should be stored in a separate repository than the Base Project (I named the new repository shared-scripts).

Shared Repository – Pipeline
The Shared Pipeline will need to make sure that these scripts are available as artifacts (and run tests if you have them – which you should).
Let’s start with the GetResources files. A single stage will work for this scenario and we add a single job that publishes the scripts to an artifact named GetResources.
We also want to allow the script in the HelloWorld folder to be available as an artifact but it shouldn’t be bundled in with the GetResources scripts. In this case we will add a second Job to the "Publish Artifacts" Stage. The two jobs will run in parallel, making the pipeline quicker than if they were two tasks in the same job and we can publish each to their own artifact.
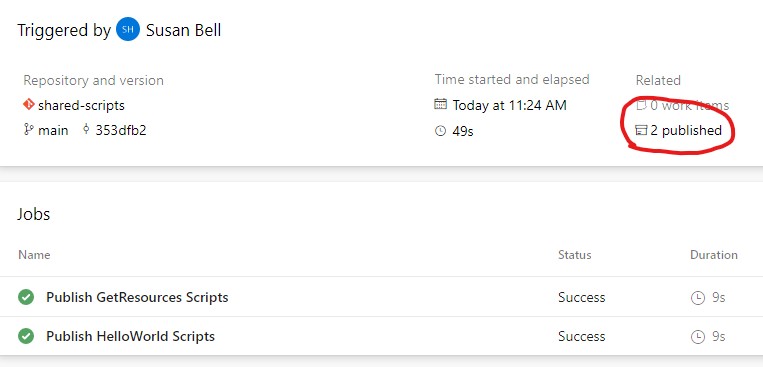
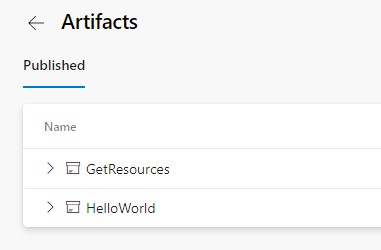
In Azure Pipelines create a new Pipeline for the Shared Repository and Shared Pipeline, and run it. Two jobs will run (simultaneously depending on the number of concurrent builds you have purchased) and two artifacts will be published.


I cover the basics of the pipeline syntax and how to create the pipeline in Azure DevOps in Part One of my Multi-stage Pipeline series (https://www.mercuryworks.com/blog/creating-a-multi-stage-pipeline-in-azure-devops/)
Retrieve Shared Artifacts
Back in the Base Pipeline there are three updates needed -
- Define the pipeline the shared file is in
- Download the appropriate artifact
- Use the script in a task
First, we need to tell the Base Pipeline that it also needs to pull resources from the Shared Pipeline. A resources block at the top of the pipeline.yml file will define where the Shared Artifacts can be found.
A pipelines resource is defined.
-
pipeline: Alias name for this resource. Here I've named it "SharedScripts" - this can be any descriptive name, though it is best to have no spaces.
-
source: The name of the pipeline that produces the artifacts the Base Pipeline needs. The name of the Shared Pipeline goes here -
shared-scripts.
Note that while Azure DevOps defaults a newly created Pipeline name to the same name as the Repository that it is for, they may be different. Verify the required Pipeline name to avoid errors.
The next two updates need to be done in each of the stages we want this to run. Let’s start with the 'Staging Deployment' stage.
Under steps there are two new tasks -
download
-
download (line 27): The alias of the resource defined in the previous step
-
artifact (line28): The name of the specific artifact the Shared Pipeline produces that we want to download. Remember above, that the Shared Pipeline produced two artifacts. We only want to download the "GetResources" artifact. If you wanted to download multiple artifacts from the same pipeline then each artifact would require its own
downloadtask.
AzurePowerShell
-
azureSubscription (line 32): This is the name of the Service Connection for the subscription the pipeline will connect to. See Part 2 of my Multi-stage Pipeline series for how to set up a Service Connection (https://www.mercuryworks.com/blog/multistage-pipeline-azure-devops-pt2/)
-
scriptType (line 33): This indicates if the script to be run will either be from a file or an inline script on the task.
-
scriptPath (line 34): The path to the PowerShell file to run.
$(Pipeline.Workspace)is a built-in variable to indicate where all artifacts downloaded for the stage are stored. The folder the file lives in is the same name as the artifact that was downloaded in the previous task. -
scriptArguments (line 35): In the PowerShell script a mandatory parameter was created for the
resourceGroupName, so we define that here. The syntax is the same as if we were calling the script in a command prompt. Update the name to match the Resource Group you would like to check. -
azurePowershellVersion (line 36): It is possible to specify the version of PowerShell if needed, but ours will work fine with the latest version
Here you can find the full Base Pipeline with both the Staging and Production stages updated - https://gist.github.com/cashewshideout/f56f6ca19b48054525053d43b476d0bf
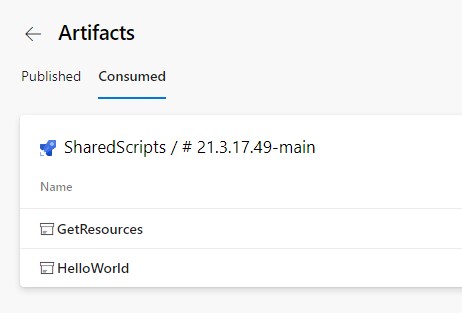
Running the updated pipeline in Azure DevOps, the pipeline understands that it is going to need the artifacts from the Shared Pipeline and lists it on the overview as consumed. It knows that these artifacts are available but will not download them until the specified task.


In the first download task logs it shows that only the GetResources artifact was downloaded. It also shows the location that the files were downloaded to.

In the logs of the AzurePowerShell task (I did not give it a custom name so it defaulted to the task’s name) there is a lot of output of modules being imported and installed. At the end of this there is a table with details of the resources that are in the stg-MWKS-PipelineApp Resource Group.

The production stage will have a similar set up and output, the only change in the AzurePowerShell task is to change the resourceGroupName argument being passed in.
Conclusion
Sharing regularly used scripts between pipelines helps keep them uniform and prevents the issue of one project potentially being forgotten in an update. When setting this up in another pipeline the only thing that needs to be different are the argument values being passed in on the script step itself.
The resources section has much more flexibility as well if you want to specify specific branches that were built or a branch with specific tags. This would help with versioning and testing in case all pipelines are not ready to use an updated script.
Resources
Multi-stage Pipeline Series Part 1 - https://www.mercuryworks.com/blog/creating-a-multi-stage-pipeline-in-azure-devops/
Azure PowerShell Task - https://docs.microsoft.com/en-us/azure/devops/pipelines/tasks/deploy/azure-powershell?view=azure-devops
Resources in Yaml - https://docs.microsoft.com/en-us/azure/devops/pipelines/process/resources?view=azure-devops&tabs=example